If you ever wanted to have a handsfree Bluetooth enabled full face Motorcycle helmet but don’t want to pay the price, this is a great DIY project that could both be extremely practical and help reduce dangerous phone conversations while on the road.
[Note: Some readers have advised about the dangerous aspects of cutting, amending, and changing the motorcycle helmet…that is true! This project is provided as content only and does not encourage or vouch for the safety of this diy. A professional helmet and Bluetooth Kit would be a much safer alternative.]

We have been fortunate enough to receive a great and detailed DIY about making a Bluetooth motorcycle helmet all by ourselves. The project is not an easy one, but it does allow you to customize your own helmet, determine the location, and finish a project that is both practical and something to be proud of.

The creator of this motorcycle helmet DIY is Leon Buijs which can be contacted here, and he provided the detailed steps for such a product (and the gallery images of the project):
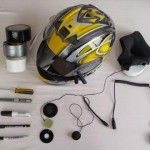
1. Find the set of Helmet speakers and microphone for your motorcycle helmet. Leon has used HS100T from IMC, which are inexpensive, provide loud volume and work great in combo with WayPoint Blue-Talk Wireless Bluetooth Headset.
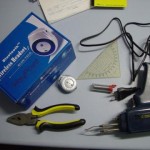
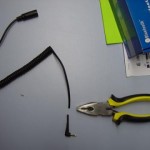
2. The materials Leon used are: Screwdriver, duct tape, markers and a sharp multi-purpose knife.
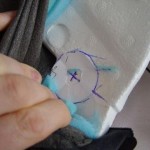
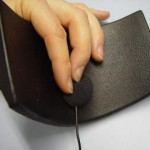
3. Determine the location to place the speakers by placing them inside while wearing the helmet. Afterwards, mark the exact place using a white marker.
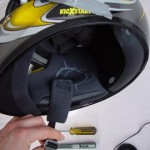
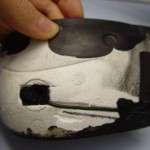
4. Take out the inside lining…neatly, so it could be placed back correctly. It may be fastened with tape, buttons or other ways, to make it come out conveniently.
5. Make a small dummy out of paper for the speaker and then use it to draw out the speaker area on the polystyrene core of the helmet.
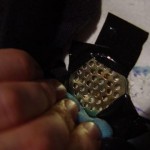
6. Cut a fine area to make sure the speaker fits it snug.
7. Attach the speakers with durable tape. Note: make sure not to cover the speaker holes.
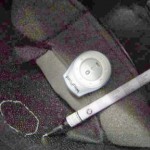
8. Determine where you want to add the Bluetooth device. If it is small enough, it could easily be added in the polystyrene foam layer in the back of the helmet – Outline it with a white marker.
9. Carve out the area and fit the BT device.
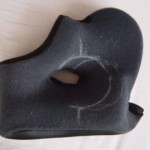
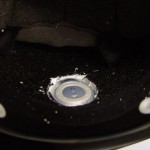
10. The polystyrene chin piece of the helmet can usually be removed easily. Decide the are which the microphone could easily be attached which would also make it efficient and comfortable.
11. In this specific case, the connector wire was too long, so it was cut, shortened and attached back together to finalize the entire Bluetooth Helmet.
Depending on the time, effot and DIY skills you have, this project could be done quickly and efficiently. Besides granting you a Bluetooth Motorcycle helmet to use on a daily basis while on the road, it could also be a clean job that looks good and durable.

Thank you Leon for the comment and info. Great Job!


