Ever wanted to use your notebook on the balcony or on the patio, but couldn’t, simply because your WiFi signal does not reach that area? The following WiFi booster is among the cheapest ways of increasing the area covered by your router.
The tools needed for this DIY project include a beer can (an empty one, obviously), a utility knife, some putty adhesive and scissors.
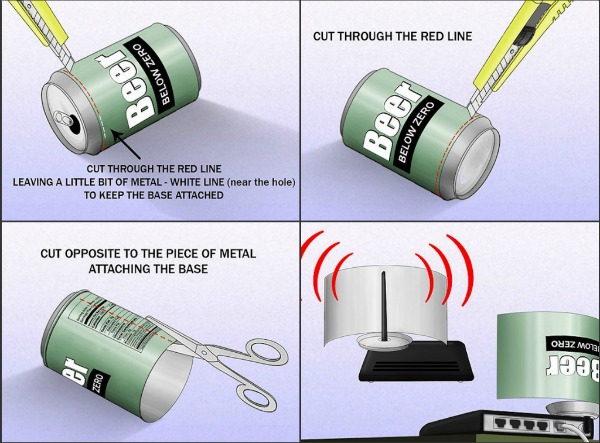
First of all, you will have to pick one can of any beer brand that you prefer from any store that you like. After enjoying the content of the beer can, you will have to wash it thoroughly and remove the pull tab. No matter how much you like the smell of beer, you do not want your router to have this odor. It is recommended to remove the pull tab after washing the can, as the router’s antenna will go through the hole.
What you need to do after washing the beer can and letting it dry is to cut the upper part using the utility knife (see left image). The base also needs to be cut, but not completely, as you will still need it to be attached to the can.
Next, you will need to cut the can lengthwise, starting from the part that is opposite to the base. Finally, you have to cut a hole through the base of the can. The hole needs to be big enough to accommodate the antenna of the router. After attaching the cut beer can as seen in the lower right picture, you will notice that the WiFi signal of your router will increase dramatically.
Using a beer can for this project is obviously one of the cheapest solutions, but soft drink cans will work as well. As a matter of fact, any sheet of aluminum will do, as this is the material from which the cans for these beverages are made. The only thing you need to make sure after setting up this beer can WiFi booster is that kids do not get near it, as they could easily cut themselves.
If you liked this post, please check this signal boosting antenna and this guide on how to increase the WiFi signal by yourself.


